So we have your images the way you want them and it's time to make prints...are all printers created equal? The short answer is a big fat "NO". A lot of printers produce very poor prints. Some aren't even really photos--they are from an inkjet printer. You might as well print them at home.
Others are well worth the cost. Most premium printers do a very fine job and can be trusted to help get the look you really want but the real surprise is that there are a lot of discount printing houses who do just as good a job. They have the same equipment as the premium printer and if your prints need no adjustment, they are probably your best bet.
To go ahead and name names, among those I use and recommend are: Walmart, Adoramapix, Snapfish, and York. They all do great work and have a fast turn around. If you have problems with a print not looking right, these companies won't be able to help you, however. The technician's just run the file through without adjusting anything and may not even know how to adjust your prints.
Professional printers don't work with the general public (normally), so go back to your photographer with a request that he or she run your file through their pro lab. The pro lab will correct color problems and the photographer can usually handle any other adjustments needed. It's well worth the expense to have prints that look fabulous.
Friday, April 30, 2010
Thursday, April 29, 2010
Getting the most from your disc part II

I was going to talk more about filters. There are so many great ones that it makes it hard to choose. The top one here is called "old" and it allows photos to be aged digitally. The color is sepia and their are subtle water spots along the edge. I love this dress with this filter...very classic. Below is one called "water". It looks like the bride and groom are standing beside a lake with their reflections in the water. You can click on these to get a better look.

This one is the ever-popular black and white with color accents. I've added a second effect on the second picture "crayon edges" in a vignette...look carefully at the flowers and leaves above the couple. The next image I've added a "crayon edge" vignette...look carefully at the flowers and leaves around the couple:
 And the ever-popular black and white with color accent filter:
So you can see, the possibilities are pretty wide. You can take a fairly simple portrait and make it into something very special for display. When you receive your disc you will find these filters applied to some of the images.
Wednesday, April 7, 2010
Getting the most from your image disc

The wedding is over and your pictures are up. This is when the fun begins! Going over all the images will remind you of this special day...all the laughs and tears, all the details. The wedding tends to be a wonderful blur to the bride and groom and these images will anchor the event forever and allow you to share it with friends and family for years to come. There is only one little detail...you need to pick your edits or pick your album pictures (if I'm creating an album for you). I have already sent a high resolution disc to you with my edits so you can go ahead and make prints but you want to make sure you have what you want and that you get the best possible prints. First of all, take a moment with your disc and the image I sent with it. Find the image (it should be first) on the disc and put it up on your monitor. Take the printed image and hold it up next to the image on your monitor and see if there is any difference in color or brightness. Adjust your monitor until they match. This will ensure that the image you see is the image you will get back from the printer.
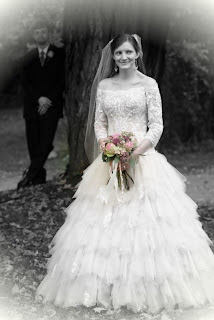
Then think about what you want from me. Will you be making 8x10 inch prints? This size cuts a full two inches off of the unedited picture on the long side so you don't want to cut off someone's head. I can usually edit a picture so it works as an 8x10 by recreating more background. You may want cropping done for a closer in picture and you will lose quality if you crop the images I gave you. Then there are special effects like vignettes (such as this one at the top). Vignettes look especially good framed. This one also has the black and white with color detail effect.
Don't do black and white conversions on the machine at the store. Even though you can do this, it won't be as good. I adjust brightness and contrast whenever I convert a file to black and white and the machine will only take the color out, leaving a dull image as your print.
You may also want to zoom in a little. To make sure you get the best crop the resolution needs to be tweaked--you don't just want to cut the image down--especially if it is a larger print. Let me know if you want to crop in closer and I can make sure you get the best quality image possible.
Check back next week when I talk about all the other options you have for editing and give examples of what those look like-- stay tuned!
Subscribe to:
Comments (Atom)


